Orders Management Portal 7.5

Product Release Notes
Orders Manager V7
Release 7.5
October 25, 2021
Product Detail and Version
Product Name | Version | Date | Comment |
|---|---|---|---|
Orders Management Portal | 7.5 | October 25, 2021 |
Revision History
Date | Version | Description | Author |
|---|---|---|---|
10/25/2021 | 1 | Release Notes |
Feature Release list contained in Version 7.5
Enhanced Standard Order Release features
ABN generation for Medical Necessity on Order Release
Enhanced Test Favorite Functionality
Patient Name search by last name, first name in separate data fields
Standing and Scheduled Order limits and Expiration management
Ability to Export the Customer Test Compendium
Ability to download the Test Compendium format template
Performance Optimization
Location/clinician filtering field on user screen made a required field
Test codes within an order added to Result search screens – abnormal results in Red
Added ability for Client Admin to add a global message to the log-in screen
Detailed Product Release Description
1. Enhanced Standard Order Release Features
The OM-Portal now has the ability for customers to define the fields that are allowed to be edited on the Order Release page prior to releasing an order; except for fields required for matching criteria in the interface(s). These fields are defined as Last Name, First Name, Gender, DOB, Primary Patient Code (patient ID), and Patient Location. The PSC user will first navigate to the Order Release Menu and access the Standard Release Order Search page to search for the patient’s order:
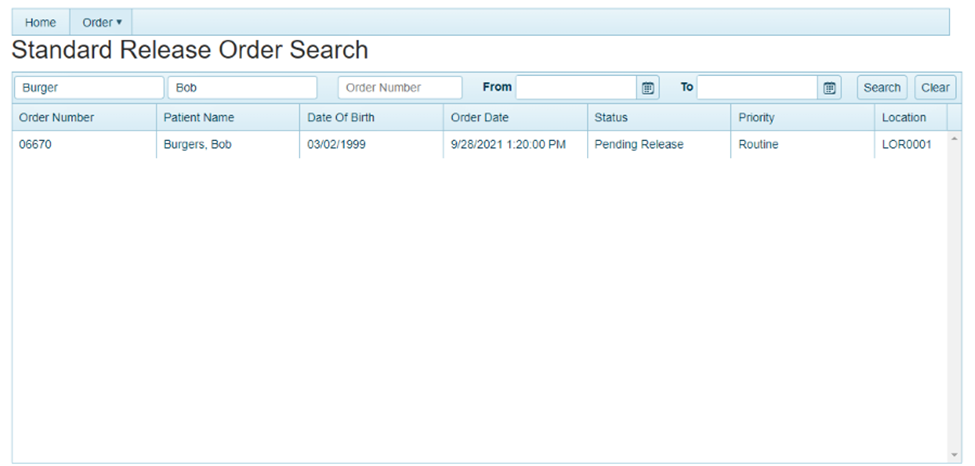
Figure 1- Standard Release Order Search
When the user has found and selected the patient’s order, they would like to release, the order will open and allow editing of the permissible fields. Release Order data is separated into the following sections: Patient, General, Primary Insurance, Secondary Insurance (if applicable), Guarantor, Diagnosis, and Test. The user will be able use the scroll bar on the right side of the popup screen to access each of the order sections. Users will be able to edit and verify all data associated to the order in accordance with OM Installation configurable options. Data in the blue text is editable, while data in gray is for verification only and will not be available to edit during the standard Release Order process.
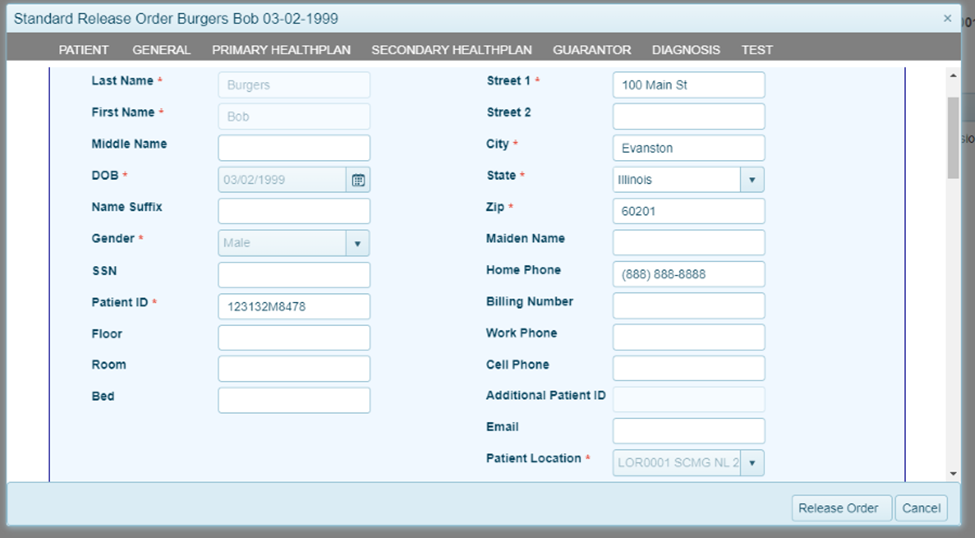
Figure 2 – Patient Demographic screen edits Standard Order Release
Should the Diagnosis section of the order be set to allow editing. The user can delete a diagnosis associated to the order by clicking on the trash can icon on the right side of the diagnosis line item they wish to remove. A new diagnosis may be added by entering text in the diagnosis search box to search by diagnosis code or name, and then selecting the appropriate diagnosis from the list returned by the search criteria.

Figure 3 – Standard Order Release diagnosis edits
If configured by OM Installation users will be able to view and add tests to the current order. They will also be able to delete or remove a test that is added to the associated order during the Release Order process. To add a test to the associated order the user will be able to enter the test name or code in the search box at the top of the Test section. Then the user will select the test they wish to add to the order from the list of tests that were returned by the search criteria. Test favorites that appear on the order screen may also be selected to add a test to the order. Regardless of the OM Installation configuration no user will be able to delete or remove any tests that were associated to the original order. The AOE and additional information functionality remains unchanged. To view and edit ordered Test AOEs, click the triangle to the left of each test line item to expose the AOE edit form. Then review, edit, or answer all AOE questions for each test by typing in the free text boxes or selecting from a prepopulated dropdown list on the scrollable AOE tab of the edit form. Click on the More Information tab on the AOE edit form to access additional test information. When all AOE questions are answered they will be saved in accordance with the Release Order and Cancel button functionality. The illustration below shows that the selected favorite test is grayed out for any editing and the trash can is not available to remove the test ordered by the doctor’s office. Additional tests can be added by the PSC user.
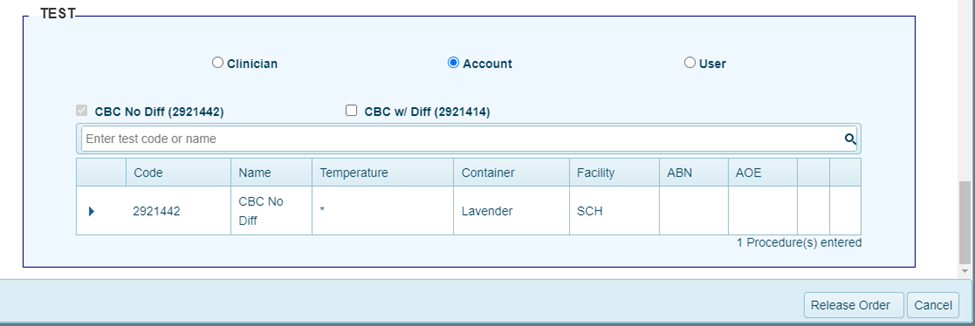
Figure 4 – Test adds Standard Order Release
As an order release or PSC User Type Role, there is the ability to Release the Order, or Cancel the Pending Release order data after reviewing and editing the order in the Release Order screen. There are two buttons at the bottom of the Release Order screen. I can select Release Order to electronically send the order to the lab and print the order requisition to accompany the lab specimen. I can also select Cancel to cancel all my edits made during the order release process and return the order to a pending release status.
2. ABN Generation for Medical Necessity on Order Release
If a User selects a test order that is in accordance with the rules for Medical Necessity checking an ABN will now be generated when the order is released from the Standard Order release screen.
The OM-Portal now contains a configurable functionality option to generate an ABN if required from the Order release screen. When medical necessity rules are in place, and if CPT4 test codes and ICD-10 diagnosis dictate, an Advanced Beneficiary Notice of Non coverage (ABN) will generate. The user will see an additional column in the Test Section titled ABN. This column will populate with ABN, in red bold text, on the test line, “ABN” if an Advance Beneficiary Notice is required. This flag indicates that if the order is submitted, an ABN will generate for this test requiring patient signature. If the ABN column is blank an Advance Beneficiary Notice is not required. See example screenshots below illustrating a test needing an Advance Beneficiary Notice and one not needing a notice.

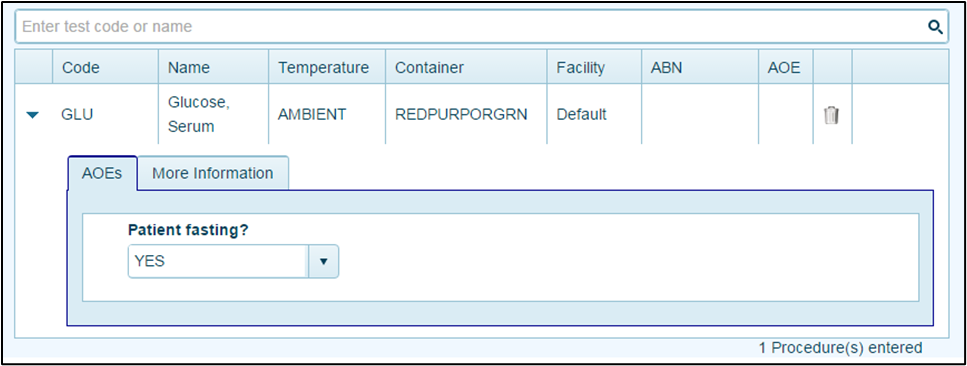
Figure(s) 5 & 6 – Standard Order Release ABN required/no ABN required
Upon submission of the Order the User will see both the Order Requisition and the ABN; the ABN can be printed out for the patient’s signature. See sample ABN PDF below.
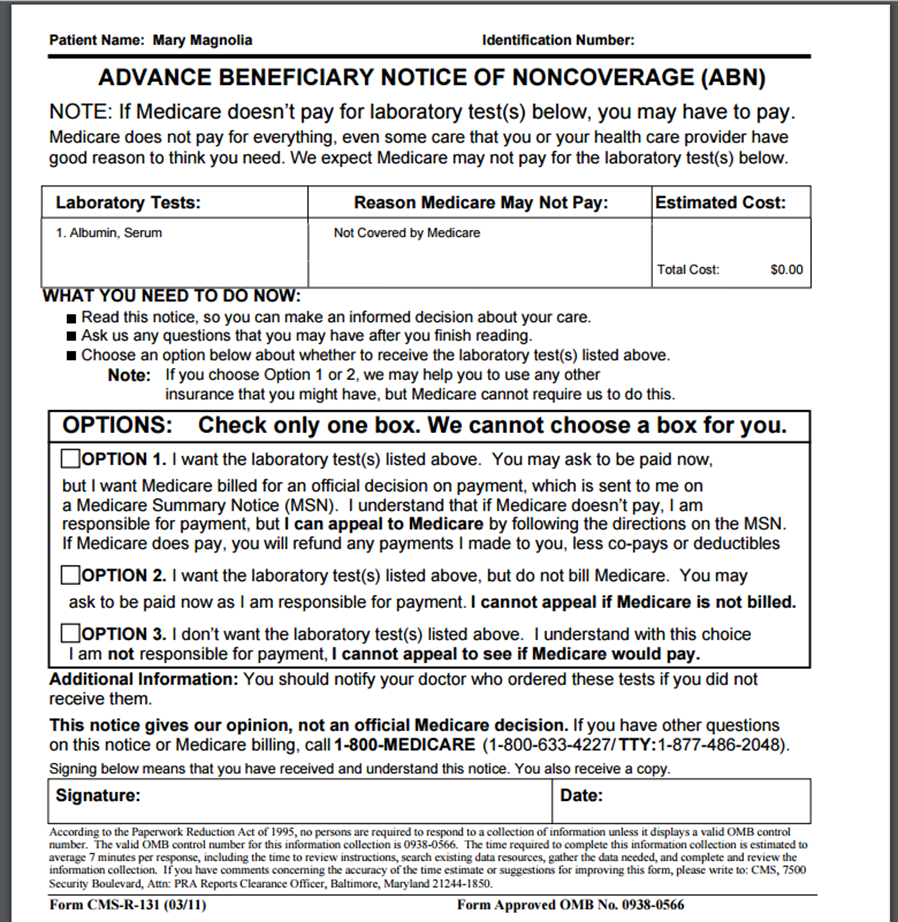
Figure 7 – Sample ABN form Standard Order Release
3. Enhanced Test Favorite Functionality
For ease of use, the V7 Orders Management portal has offered clients the ability to configure Account and Clinician-level Test Favorite lists, in addition to a feature to support Frequently Ordered Tests. To further enhance the functionality of Test Favorites we have added User level favorites to be defined as part of the static favorite selections. If the Accumen/Halfpenny Admin has enabled the Frequent Tests Ordered resource instead of any of the static favorite tests resources, the client admin user will not have the Favorite Test tab visible on the Account, Clinician, or User maintenance pages.
Should static favorites be defined as the customer selection the ability to select each level of account, clinician, and user will be available to be chosen in the configuration. As the Ordering User, I will open the New Order page and be presented in the Test section with a selection of radio buttons to toggle between Account, Clinician, and User Favorite Tests lists. The Test Favorites will default to Account, displaying the favorites configured by Account. The user can then order a test from the selected Favorite Tests list by selecting the checkbox next to the orderable test, which will then add the test to the grid below. The user can then toggle over to Clinician to define test favorites or User defined test favorites if both are defined in the configuration. If the user should toggle between the Account, Clinician or User lists, they will see that the tests they have already selected are saved and are indicated as such in the other Favorite Tests lists if that test exists across multiple lists.
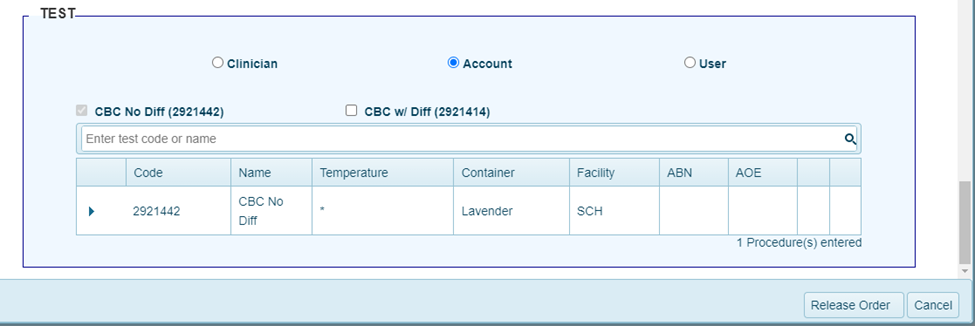
Figure 8 – Static favorites by account, clinician, user
4. Patient Name search by last name, first name, in separate data fields
All screens containing patient search criteria have been modified to have a separate field for the patient’s last name and first name. This includes the search screen in the New Order screen, all order search screens and result search screens. Each of the fields requires more than 2 characters of either the last name or first name to perform the search. The search is an exact match to the defined characters the user has input not a “contains in” match.
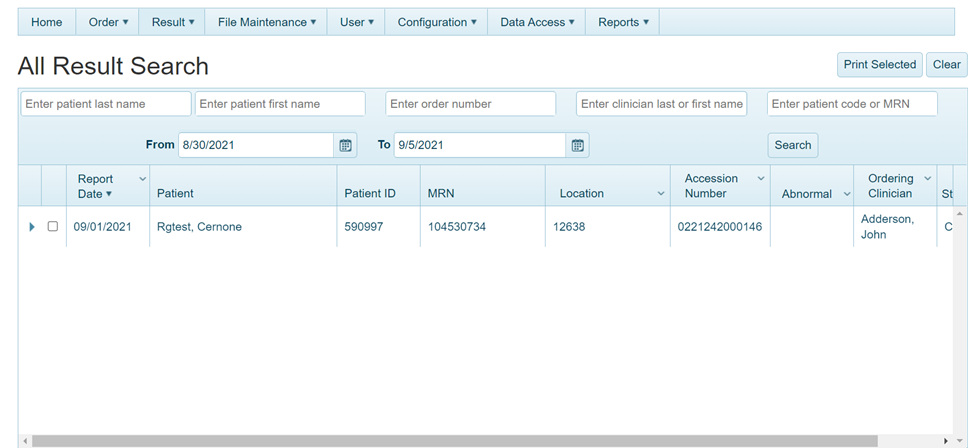
Figure 9 – Patient Name Search on all Order/Result Search and Patient Order screens
5. Standing and Scheduled Order limits and expiration
Customers implementing OM and future and standing orders require the application to adhere to
standards within their system to limit how far into the future standing and future orders can be placed, as well as allowing standing orders to expire. The default for allowing standing orders to be placed is 365 days into the future. The Accumen/Halfpenny Admin will obtain from the client three numbers that will determine how the configuration in V7 OM is made with regards to standing and future orders:
a. The number of days an ordering user can schedule any order into the future.
b. The number of days that must pass before a past scheduled order can expire.
c. If the client will use Order Release, the number of days that must pass before a Pending Release order can expire.
On the order screen when a user selects how far into the future, they can place a future dated or scheduled order they will be restricted by the settings that have been defined by the customer in each of these settings. In the order release screen the restriction will be placed upon the number of days defined as to when a pending order will expire.
As the ordering user, if I type in my schedule date manually into the Order Date field (if using Future Order) or Start date field (if using Standing Order) and the configuration is set so that the date exceeds the limit, the user will not be able to submit the order and the application will display the following error message: “Start date exceeds the allowable limit of days in the future. Please select a valid date”.
As an Ordering user, if I create a Standing Order and the configuration is set, the application will check the child order(s) to confirm that the End By date or the date assigned by the End after n occurrences is written within the limit of the setting defined. If it is not, the user will not be able to submit the order and the application will display the following error message: “Scheduled recurrences exceed the allowable limit of number of days in the future. Please select valid date(s).”
As the Ordering user, I will be able to view an order that has expired in the Order Search Screen, or All Order Search (admin user) section of the Order tab and it will have a status of “Expired”

Figure 10 – Expired Orders in Order Search screens
As the Ordering user, when navigating to Manage Scheduled Orders, expired child orders will be viewable. The child order will display on the main page as “Expired”

Figure 11 – Expired Orders in Managed Scheduled Orders screen
As the ordering user, when navigating to Release Standing Orders, they will not be able to see any expired orders. Only orders with a status of “Scheduled Release” will be available.
As the ordering user, when navigating to Release Order, they will not be able to see any expired orders. Only orders with a status of “Pending Release” will be available.
As the ordering user, when navigating to New Collection List, they will not be able to see any expired orders. Only orders with a status of “Scheduled Release” will be available.
6. Ability to export the customer test compendium
The client admin has the abiltity to export their test compendium from the File Maintenance menu by selecting File Maintenance>Test Catalog>Test and then using the Export button at the top right of the screen. The export will be in the format required for import into the portal. An import feature will be in a future release and will initially be grayed out.
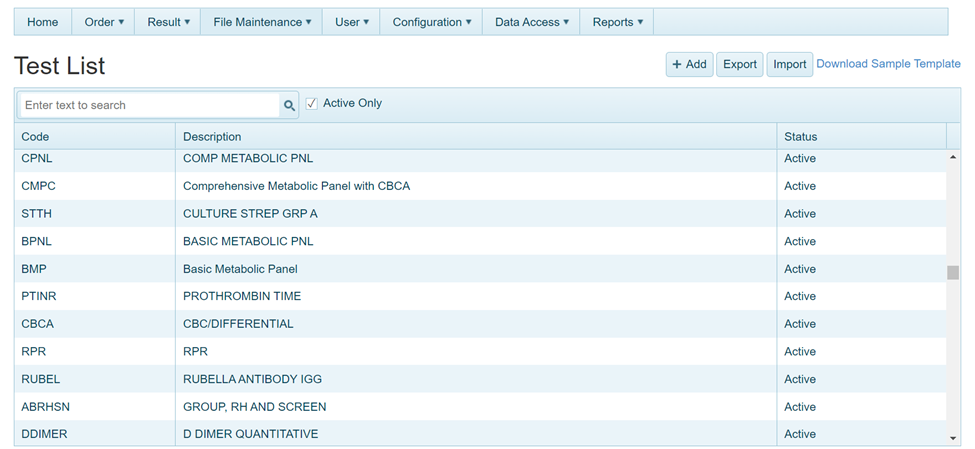
Figure 12 – Export Customer Test Compendium
7. Ability to download test compendium format template
The client admin can download the format template that is utilized in collecting the test compendium data to import into the V7.5 portal database. The template will identify all possible fields for input and highlight the required fields that need to be present for the import by the Accumen/Halfpenny admin. The screen above in Figure 12 illustrates the selection on the screen to Download Sample Template. Example output is below:
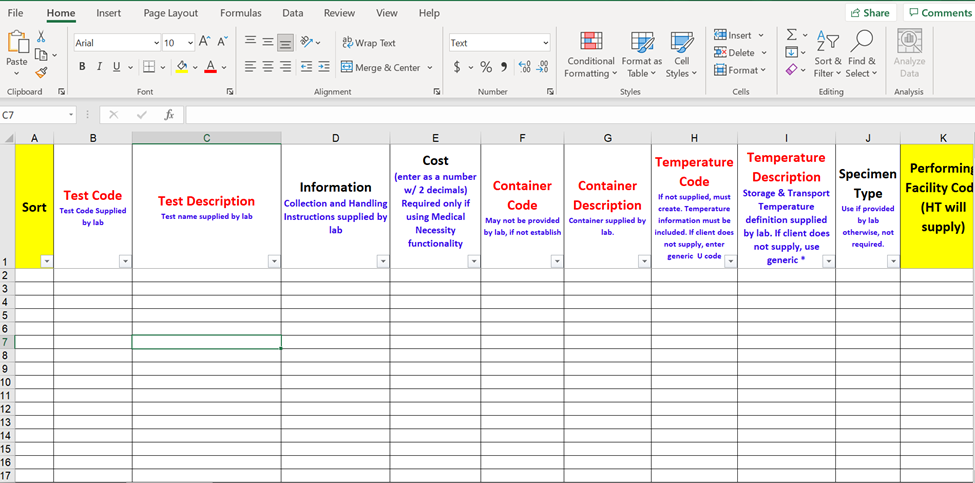
Figure 13- Sample Test Compendium Template
8. Performance Optimization
The OM-Portal has been evaluated & enhanced for performance optimization in identified areas in various screens with concentration on the ordering screens.
9. Clinician/Location filtering field made a required field on the User Screen when setting up a new user.
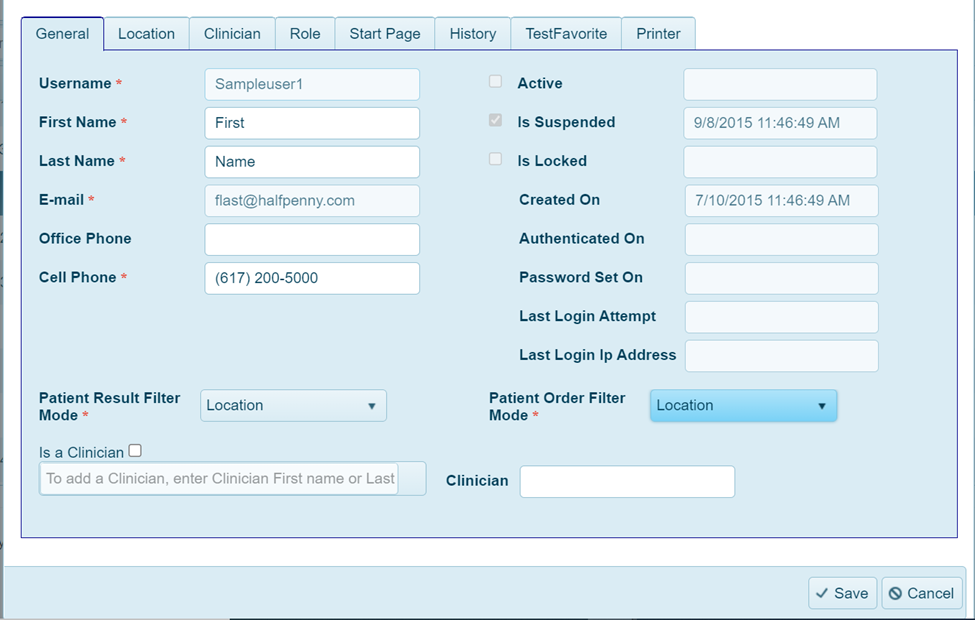
Figure 14- * indicates Patient Result Filter Mode and Patient Order Filter Mode are required fields
10. Test codes within an order added to result screen searches
The Inbox, Search Result, and All Result Search screens have been updated to display the tests associated to the order as they are received from the laboratory. The user can select the arrow to the left of the result transaction for the patient and the tests will display. Abnormal test results will show in RED and the Abnormal column showing a Y in RED, as in previous versions of the portal, will also appear.
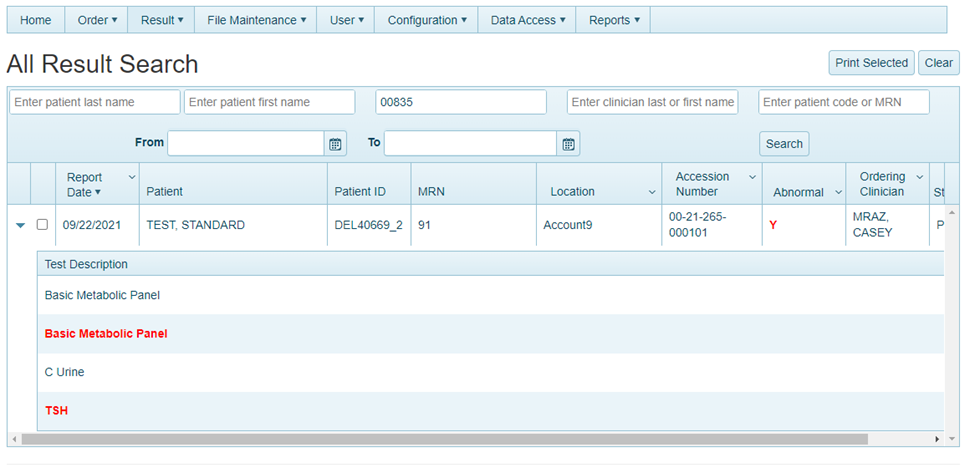
Figure 15 – Inbox, Result Search, All Result Search
11. Added ability for Client Admin user to add a message to the login screen
A client admin type role has the capability of creating a global message to all portal users. The role will be configured by the Accumen/Halfpenny resources to allow the client admin to access the Application selection from the Configuration Menu.

Figure 16 – Client Admin Access Global Portal Message
The client admin user will select the Application menu. An open dialog box will display for the admin to type in the global message they would like all portal users to see on the login page.
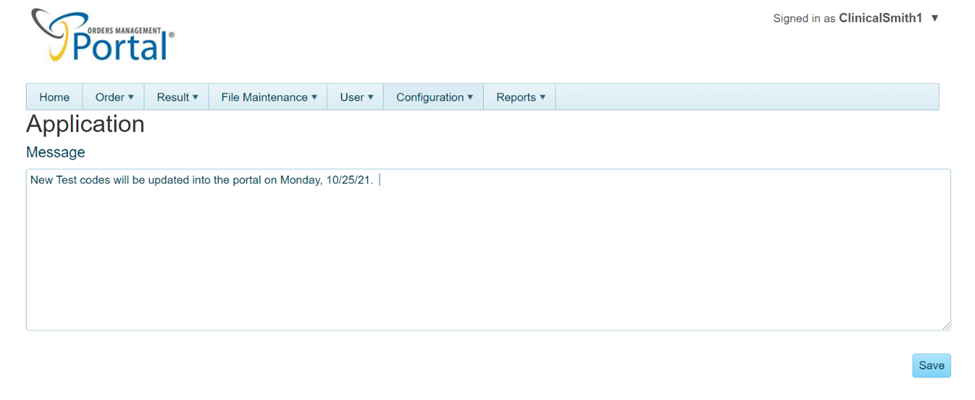
Figure 17 – Client Admin creation of Global Message
The Portal Users will see the global message displayed on the login page below Forgot Username and Forgot Password prompt, prior to accessing the portal.
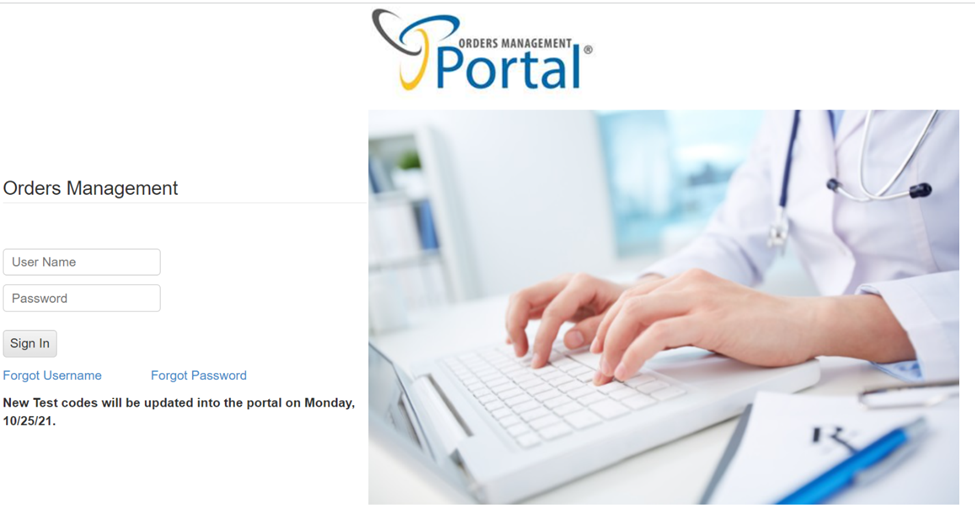
Figure 18 – Global Message appears on login page for all users
Downloads
© Accumen Technology Solutions |
|---|
